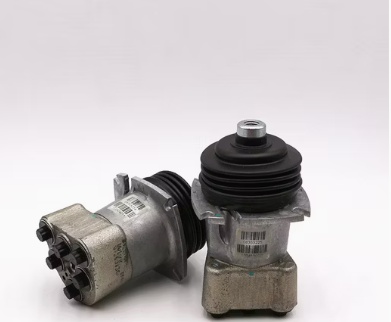
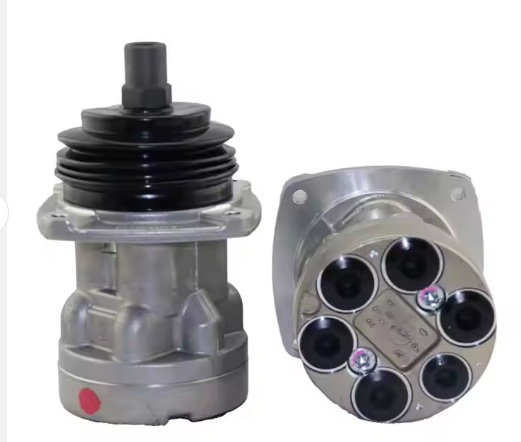
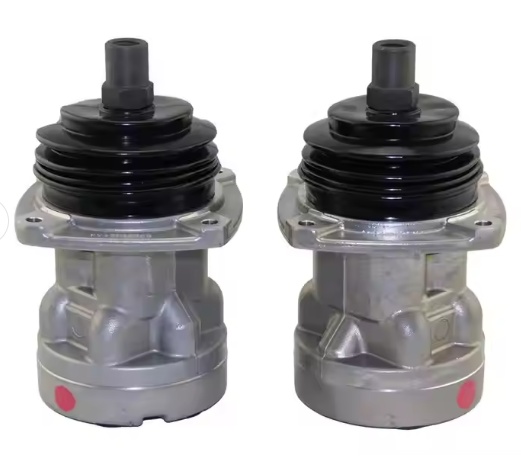
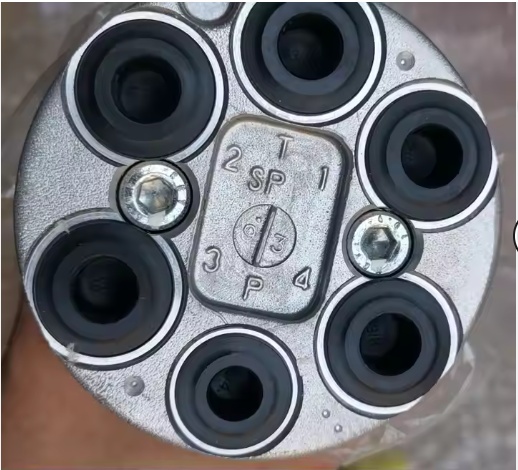
Sany B220401001302 Hand -controlled pilot valve handle
1. Accurate control: it is sensitive to the reaction and can accurately control the action of the main valve, providing accurate operation when excavating soil and smoothness.
2. Durable and reliable: the valve core made of high -quality materials is specially processed to ensure wear resistance and corrosion resistance and can work stably in difficult working conditions.
3. High adaptability: designed for various types of Sany excavators, has an exact interface, simple installation and perfect compliance with the hydraulic system of the entire machine.
Product representation
1. Detailed product information
1. Structural composition
Valve case: usually made of high -strength alloy steel, which has good resistance to pressure, wear and corrosion. The valve body is designed with accurate oil channels that provide the flow of hydraulic oil along the given path, which provides accurate control of the main regulatory valve.
Valve core: valve core is the main component of the pilot valve. It is usually made of high -quality steel by precision processing, and the surface is subjected to special processing, for example, chrome, to increase its wear resistance and corrosion resistance. The shape and size of the core of the valve are developed in accordance with various management requirements. It can flexibly move in the valve body to control the flow and direction of hydraulic oil.
Spring: the pilot valve is equipped with several springs to provide an effort to return to its original position so that the valve core can return to its original position in the absence of external power. The coefficient of the elasticity of the spring is carefully calculated to ensure the speed and stability of the pilot valve.
Control handle: control handle connected to a pilot valve allows the operator to conveniently control the capture valve. The handle is designed in accordance with ergonomic principles. It is simple and flexible in operation and allows you to achieve accurate management of various actions of the excavator.
Seal: use highly effective sealing materials such as nitrilum rubber or fluoride to prevent hydraulic oil leakage and ensure the normal operation of the pilot valve. The quality of the seal directly affects the performance and service life of the pilot valve.
(II) The principle of work
The control valve of the excavator Sany controls the direction of the flow and the pressure of hydraulic oil to control the core of the core of the main control valve, thereby ensuring the control of the working bodies of the excavator (such as arrow, bucket handle, bucket) and the mechanism of movement. When the operator controls the control handle, the core of the control valve valve moves, changing the hydraulic oil channel, allowing the controller of the low pressure oil to enter the port of the main control valve controlled oil, forcing the core of the main control valve valve to move, thereby controlling the flow of high -pressure working oil to the corresponding executive mechanisms and implementing various actions of the excavator. For example, when the working handle is moved forward, the control valve enters the control oil into the corresponding oil opening of the main control valve, as a result of which the core of the main control valve is moved, and the oil under high pressure is supplied to the lower chamber of the arrow cylinder, ensuring the rise of the arrow.
(III) Operational characteristics
High response speed: Due to the advanced design and production technology, the control valve can quickly respond to the operator’s commands, quickly switch and accurate control of the excavator movements, as well as increase the efficiency of work.
High control accuracy: it can accurately control the flow and pressure of hydraulic oil, due to which the working device and the mechanism of movement of the excavator can work smoothly and accurately, meeting the operational requirements of various difficult working conditions.
High reliability: high -quality materials and components are selected, and after strict quality testing and testing, the pilot valve is characterized by high reliability and stability, it can steadily work for a long time in severe working conditions and reduces the likelihood of refusal.
Simplicity of operation: the control handle has a reasonable design with a small working effort, which reduces the complexity of the operator and increases the comfort and ease of operation.
(IV) compatible models
Various models of Sany excavators are suitable for pilot valves of different specifications. For example, the control valves of the SY55C small excavator, the SY215C medium excavator and the large SY750H excavator have special requirements for the consumption, level of pressure and the size of the interface to perfectly comply with the hydraulic system of the entire machine and fully reveal the excavator performance.
2. Stages of installation
1. Preparation before installation
Preparation of tools: Prepare various tools necessary for installations, such as wrenches (including uniform, mate, end, etc.), screwdrivers (cross and flat), pliers (sparse, pliers), dynamometric keys, sealants, cleaning products , hydraulic oil, etc.
Verification of accessories: Carefully check whether the model and technical specifications of the new control valve to the excavator, and also are there no defects on the appearance, such as damage, deformation, cracks, etc. At the same time, check whether the corresponding seals, bolts are the corresponding seals , nuts and other accessories full -fledged and appropriate quality.
Preparation of places and equipment: select a flat, dry, well -ventilated and lit place for installation, for example, a workshop for maintenance or a dedicated working area. Make sure there are no obstacles around for the convenience of operation. Use the appropriate lifting equipment (such as a jack, lift) to lift the excavator cab or related components, provide sufficient workspace and install safety supports under the vehicle to prevent accidental lowering.
Safety measures: Operators must wear personal protective equipment, such as protective helmets, protective gloves, protective shoes, etc., to avoid injuries during operation.
(II) disassembly of the old pilot valve
Drain the hydraulic oil: place the appropriate container for collecting oil under the old control valve, find the drain bolt of the excavator hydraulic oil, slowly unscrew the drain bolt and drain hydraulic oil into the oil collection container. During the drain process, care must be observed in order to avoid spraying hydraulic oil. If there is pressure in the hydraulic system, part of the pressure can be dropped by using the control handle before draining oil.
Remove the connecting pipeline: Using a wrench, unscrew the nut of the oil pipe mounted with an old pilot valve, and carefully remove the oil pipe. When removing the oil pipe, be sure to place it and write down the position and direction of the connection of the oil pipe so that it can be accurately connected with the subsequent installation of a new control valve. For some compounds that are difficult to disassemble, you can spray the baking powder before disassembly, but be careful so that the baking powder does not fall into other exact details. After removing the oil pipe, immediately close the jacket of the oil pipe and the junction of the pilot valve with a plug to prevent dust and pollution.
Remove the fasteners: use a suitable wrench to unscrew the bolts that fix the old pilot valve. Typically, these bolts are distributed on the mounting bracket of the pilot valve. Weaken the bolts gradually diagonally to avoid damage or deformation of the pilot valve due to uneven effort. First, spray the tool for weakening on rusted or too long bolts and wait a while before unscrewing them.
Remove the old pilot valve: after all the fasteners and oil tubes are removed, carefully remove the old pilot valve from the mounting bracket and place it in a safe place. Check the mounting bracket of the old pilot valve, clean the surface of the bracket from oil, contaminants and residues of the sealant, and also make sure that the mounting bracket is flat, clean, without damage and deformations.
(III) installation of a new pilot valve
Install the pilot valve on the bracket: place a new pilot valve on the mounting bracket and combine the mounting holes. Put on the connecting bolts, but do not tighten them completely to ensure the possibility of subsequent adjustment of the pilot valve.
Connect the pipeline: connect the oil tube to the new pilot valve in accordance with the previously applied marking. Apply the required amount of sealant on the connection of oil pipes to enhance the sealing effect and prevent oil leakage. Use the wrench to tighten the nut of the oil pipe to make sure that the oil pipe is securely connected. Be careful not to pull it so as not to damage the oil pipe or connection.
Adjust and fix the pilot valve: use the alcohol level to check the horizontality of the pilot valve and maintain its horizontal position, adjusting the tightening of the connecting bolts. Check the gap between the pilot valve and the surrounding components to make sure that the pilot valve does not interfere with the work of other components. Using a dynamometric key, tighten the connecting bolts one at a time in accordance with the specified moment of the tightening. Pull them gradually diagonally to provide an uniform tightening force of each bolt and reliable fastening of the pilot valve.
Add hydraulic oil: When adding hydraulic oil, pay attention to the purity of oil to avoid impurities entering the hydraulic system.
(IV) check and debugging after installation
External inspection: check the correctness and reliability of all compounds of oil pipes, as well as the absence of weakening, twisting or improper connection. Check the correctness of the mounting position of the pilot valve and the reliability of its mounting to the mounting bracket. Check if the sealant is evenly applied, whether there are no passes or excessive overflows.
Stress test: run the excavator engine and let it work at idle. Use professional testing equipment under pressure, connect it to the output pipeline of the pilot valve and check the output pressure of the pilot valve. Check if the pressure value is within the technical parameters specified for equipment. If not, check if there are malfunctions in the pilot valve, hydraulic pump, safety valve and other components, and perform appropriate adjustments or repair.
Tight test verification: during the engine operation, carefully check if there is a leakage of the oil at the junction of the pilot valve with the oil tube, on the surface of the valve body, etc. When the oil leak is detected, stop the machine immediately and find out the cause of the leak. The reasons can be damaged seal, improper installation, weakened bolts, etc. Report or reinstall depending on specific problems.
Checking performance: Using the excavator control handle, check whether the operating device and the excavator movement mechanism work normally. Pay attention to the smoothness and accuracy of movements, whether there are freezing, unusual noise or trembling. During operation, check the sensitivity of control of the pilot valve and compliance with the speed speed with the requirements. If you find any deviations from the norm, stop the car in a timely manner to check and eliminate the malfunction.
3. Common malfunctions
1. Operational failure
Reason: jamming of the valve core, which can be caused by pollution of hydraulic oil, impurities in the gap between the valve core and the valve body, which leads to the impossibility of normal movement of the valve core; spring malfunction, for example, spring fatigue, breakdown, etc., which makes it impossible to discharge the valve core; The malfunction of the control handle, for example, weakening the connection of the handle, damage to internal parts, etc., which leads to the impossibility of normal transmission of working effort.
Symptoms: when the operator controls the control handle, the operable device or the movement mechanism does not move or move abnormally and cannot work in accordance with the instructions.
2. Vasation leak
Reason: aging, damage or improper installation of seals, for example, aging and loss of elasticity of the sealing ring, damage to the sealing laying, etc., which leads to a leakage of oil in the junction between a pilot valve and an oil tube or on the surface of the junction of the valve body; Cracks or sand sinks in the valve body can also cause a leakage of hydraulic oil.
Symptoms: traces of hydraulic oil leakage can be seen around the control valve or on oil pipelines, and the level of hydraulic oil falls, which in serious cases can affect the normal operation of the excavator.
(III) abnormal pressure
Reason: a malfunction of the bypass valve inside the pilot valve, for example, a spring breakdown, jamming of the valve core, etc., leads to the fact that the output pressure of the pilot valve becomes too high or too low; The malfunction of the hydraulic pump, the output pressure of the hydraulic oil becomes unstable, which affects the normal operation of the pilot valve; The malfunction of other hydraulic components in the system, for example, blockage of the pipeline, blockage of the filter, etc., can also lead to abnormal pressure of the pilot valve.
Symptoms: During the excavator operation, the output pressure of the control valve does not correspond to the normal working pressure, as a result of which the operating device moves weakly or too fast, which affects the efficiency of the excavator.
(IV) Excessive noise
Causes: wear between the valve core and the valve body increases the planting gap, causing turbulence and strokes in the flow of hydraulic oil, which leads to a noise; unimportant parts inside the control valve, such as springs, cores of valves, etc., cause vibration and blows during operation, causing abnormal noise; The air is mixed with hydraulic oil, and when the air flows in the hydraulic system, it will make the sound of bursting bubbles, which leads to excessive noise.
Symptoms: When the excavator was heard, a clear noise is heard from the control valve. The size and frequency of noise can vary when changing working actions.
4. After -sales service
1. Warranty service
As a rule, the warranty period for the control valve of the Sany excavator is 1-2 years, and the specific duration depends on the contract of sale of products. During the warranty period, if the pilot valve does not work, it flows or experiences abnormal pressure due to quality problems, the manufacturer or dealer Sany will provide free repair or replacement services.
The volume of the guarantee is limited by the quality of the product itself. Malfunctions caused by poor -quality reasons, such as improper operation by the user, hard operating conditions, untimely maintenance, etc., are not covered with warranty service, but the manufacturer or dealer may provide paid repairs and technical support.
2. Technical support
If users are faced with problems during the installation, use and maintenance of the pilot valve, they can call the Sany clients hotline at any time. Professional specialists will provide detailed technical recommendations by phone or online to help users solve problems.
The manufacturer will regularly organize technical training and invite users to participate, explaining the correct use of the pilot valve, maintenance points, general methods of eliminating malfunctions and other knowledge to improve users skills in operation and maintenance.
(III) Supply of accessories
Sany has created a comprehensive supply system of spare parts to guarantee timely supply of original pilot valves and related accessories, such as cores of valves, springs, seals, bolts, etc. Users can purchase suitable high -quality accessories through local dealers, service centers or an official platform Electronic commerce of the manufacturer.
In case of urgent needs, manufacturers or dealers provide accelerated delivery services to reduce the supply of accessories, reduce the downtime of equipment and reduce the economic losses of users.
(IV) maintenance
Sany has opened many authorized service centers for maintenance throughout the country with professional maintenance specialists and advanced equipment for maintenance, which allows users to provide effective and high -quality maintenance services. Users can send faulty excavators to the nearest service center for repair.
For some large equipment or emergency situations, service centers can provide maintenance services “from the door to the door”. Technical experts will bring to the place the necessary tools and accessories for the timely elimination of equipment malfunctions and ensure its normal operation.
The stages of installation of the control valve of the Sany excavator
1. Preparation before installation
1. Preparing the tool
Washing keys: Prepare the unitary, lacture and end keys to remove and install bolts and nuts connecting the control valve with an oil pipe and a mounting bracket. Keys of different specifications can be adapted to connectors of different sizes. For example, 12-14 mm keys are used for conventional nuts of oil pipes, and keys of 17-19 mm are used for bolts on mounting brackets.
Slate: equipped with a cross -shaped screwdriver and a flat screwdriver for removing and installing small screws that can be used in a pilot valve, for example, screws that attach a small sensor or a factory plate on a pilot valve.
Pla -rosuckers: Prepare the sprouts for the clamp of small parts, such as locking rings that can be used during the installation process; Plafers with carp joints can be used for a clamp of larger parts for ease of work.
Dynamometric key: this is an important tool for accurate installation used to tighten the bolts with the specified moment, which provides a reliable and correct installation. The tightening of the bolts of the control valves of different models of Sany excavators differ, so strictly follow the equipment operating manual.
Other tools: prepare a sealant and apply it to the joints of oil pipelines to enhance the sealing effect and prevent oil leakage; The cleaning product is used to clean the installation site and oil pipelines from oil spots and pollution; It is also necessary to prepare the corresponding amount of hydraulic oil, which meets the requirements of the system replenishment after installation.
(II) Verification of accessories and equipment
Checking the control valve: Carefully check the model and technical specifications of the new control valve to make sure that it is fully consistent with the excavator model. For example, the SY215C excavator must be equipped with the control valve of the corresponding model, and they cannot be mixed. Check the appearance of the pilot valve to make sure that there are no cracks or sand shells in the valve case, that the valve core is freely and without jamming, and also in the fact that the spring is not broken and not deformed.
Checking the relevant accessories: Check if the corresponding seals, bolts, nuts and other accessories are full -fledged and appropriate quality. The seals should not be old, deformed or damaged, and the bolts and nuts should not be torn or deformed to ensure smooth installation.
Preparation of lifting equipment: select the right lifting equipment, for example, a hydraulic jack or lift. The hydraulic jack should have a sufficient carrying capacity for the safe lifting of the excavator cab or related components to ensure the working space for installation. Before use, be sure to check the performance of the lifting equipment to make sure of its safety and reliability.
3. Planning of the site and security measures
Choosing a place: choose a flat, dry, well -ventilated and lit place, for example, a professional repair workshop. There should be no obstacles around the site that could prevent the performance of work, and it should also be far from the sources of fire and flammable materials in order to avoid accidents.
Safety measures: Operators must wear personal protective equipment, such as protective helmets, protective gloves and protective shoes. A protective helmet can protect the head from random blows, protective gloves can protect the hands from scratches and burns, and protective shoes can prevent blows on the legs with heavy objects.
(IV) Preparation for the dismantling of the old pilot valve
Turning off the equipment and turning off the power: Park the excavator in a safe place, put it on a manual brake and make sure that the vehicle is motionless. Turn off the engine and disconnect the negative terminal terminal to prevent random launch or electric shock during operation.
Cleaning the working area: use brushes, vacuum cleaners and other tools for garbage, dust and oil harvesting in the work area, maintain cleanliness and order at the workplace, do not allow pollution to the installation zone and influence the installation and operation of the pilot valve.
Marking and recording: mark and write down the position of the oil pipe, the position of the fastener and the direction of each oil pipe of the old pilot valve. For example, make appropriate marks at the junction of an oil pipe and a pilot valve, and also write down a tightening sequence and the torque of fasteners to have accurate data for installing a new pilot valve.
2. Dismantle the old pilot valve.
1. Drainage of hydraulic oil
Set a suitable container for collecting oil for the old control valve to prevent a leakage of hydraulic oil to the Earth and the occurrence of pollution and waste.
Find the drain bolt of the hydraulic oil tank of the excavator and slowly unscrew it. If there is pressure in the hydraulic system, first use the control handle to partially discard the pressure in the system, and then squeeze the oil to avoid spraying hydraulic oil.
(II) dismantle the connecting pipeline.
Using a wrench, unscrew the nut of the oil pipe mounted, connected to the old pilot valve, and carefully remove the oil pipe. In the process of removal, be sure to mark the junction and direction of the oil pipe using labels or markers to facilitate the exact connection with the subsequent installation of a new pilot valve.
For some connections that are difficult to disassemble, you can first spray the baking powder and wait some time before disassembly, but be careful so that the baking powder does not fall into other exact details so as not to damage them. After removing the oil pipe, immediately close the jacket of the oil pipe and the junction of the control valve with a plug to prevent dust and contaminants that may affect the purity of the hydraulic system.
(III) Remove the fasteners.
Use a suitable wrench to unscrew the bolts that fasten the old pilot valve, which are usually located on the mounting bracket of the pilot valve.
Weaken the bolts gradually diagonally to avoid damage or deformation of the pilot valve due to uneven effort. On rusty or highly protracted bolts, you can first spray the weakening agent, wait a while, and then remove them after the weakening agent completely applies.
(IV) Remove the old pilot valve.
After removing all the fasteners and oil tubes, carefully remove the old pilot valve from the mounting bracket and place it in a safe place.
Check the mounting bracket of the old pilot valve, clean the surface of the bracket from oil, pollution and the residues of the sealant, make sure that the mounting bracket is even, clean, without damage and deformations, and also provide a good base for installing a new pilot valve.
3. Install a new pilot valve.
(I) Install the control valve on the bracket.
Install the new pilot valve on the mounting bracket and combine the mounting holes to make sure that the pilot valve is installed in the correct position.
Install the connecting bolts, but do not tighten them completely so that you can subsequently adjust the position of the pilot valve and achieve the best installation state.
(II) connecting pipelines
Connect the oil tube to the new pilot valve in accordance with the previously applied marking. When connecting, make sure that the oil tube is inserted into place to avoid an incorrect or loose connection.
Apply the required amount of sealant to the connection of oil pipes, distribute it evenly to ensure good sealing and prevent oil leakage. Then use the wrench to tighten the nut of the oil pipe. Be careful not to pull it so as not to damage the oil pipe or connection. Tighten it in accordance with the indicated puffing moment.
(III) adjustment and fixation of the pilot valve
Use the level for checking the horizontality of the pilot valve and support its horizontal, adjusting the tightening of the connecting bolts. The horizontal installation of the pilot valve is crucial for its normal operation. An uneven installation can lead to uneven power on the valve core and affect performance.
Check the gap between the pilot valve and the surrounding components to make sure that the pilot valve does not interfere with the work of other components. For example, the pilot valve should be at a certain safe distance from nearby hydraulic pipelines, electric lines, etc.
Using a dynamometric key, tighten the connecting bolts one at a time in accordance with the specified moment of the tightening. Grase gradually diagonally to provide an uniform tightening force of each bolt and securely fix the pilot valve, preventing its weakening during operation.
(IV) Add hydraulic oil
After the installation is completed, add a hydraulic oil that meets the requirements to the tank. When adding, pay attention to the purity of oil to avoid impurities entering the hydraulic system and impaired normal operation of the pilot valve and the entire hydraulic system.
Add hydraulic oil to the specified level, which can be controlled and estimated by the level indicator on the tank of hydraulic oil. Too high or too low fluid levels can affect the operation of the hydraulic system and should be strictly controlled.
4. Checking and debugging after installation
1. External inspection
Check the correctness and reliability of all the compounds of the oil tubes, as well as the absence of weakening, twisting or incorrect connection. Incorrect connection of the oil pipeline can lead to a leakage of oil or poor circulation of hydraulic oil, which will affect the normal operation of the control valve and excavator.
Check the correctness of the mounting position of the pilot valve and the reliability of its mounting to the mounting bracket. If the pilot valve is installed in inaccurate or loose position, this can lead to vibration and displacement during operation, which will affect its performance and service life.
Check if the sealant is evenly applied, whether there are no passes or excessive overflows. Uneven application or lack of sealant can lead to oil leakage, and excessive overflows can pollute the equipment and the working environment.
2. Stress testing
Run the excavator engine and let it work at idle. After the engine works stably, connect professional equipment to check the pressure to the output pipeline of the pilot valve and check the output pressure of the pilot valve.
Check if the pressure value is within the technical parameters specified for equipment. The range of the output pressure of the control valves of various models of Sany excavators is different, so to evaluate, contact the equipment operating manual. If the pressure value does not correspond to the permissible range, check if there are malfunctions in the control valve, hydraulic pump, safety valve and other components, and perform appropriate adjustments or repair.
(III) testing for tightness
During operation of the engine, carefully check if there is no oil leakage at the junction of the pilot valve with the oil tube, on the surface of the junction of the valve body, etc. The leakage of the oil not only leads to the useless consumption of hydraulic oil, but can also affect the normal operation of the equipment and even cause accidents.
If the oil leak is detected, stop the car immediately and find out the cause of the leak. The reasons can be damaged seal, improper installation, weakened bolts, etc. Report or reinstall depending on specific problems. After the repair, perform another tightness test to make sure that there are no oil leaks.
(IV) Work testing
Work the excavator control handle to check whether the operating device and the excavator movement mechanism work normally. Pay attention to the smoothness and accuracy of movements, whether there are freezing, unusual noise or trembling.
During operation, check the sensitivity of control of the pilot valve and compliance with the speed speed with the requirements. Insensitive control or slow reaction of the control valve will affect the operational characteristics and efficiency of the excavator. If you find any deviations from the norm, stop the car in a timely manner to check and eliminate the malfunction.


Exhibition cabinets

Acquaintance with the plant
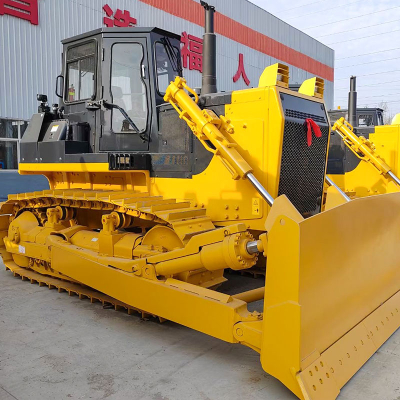
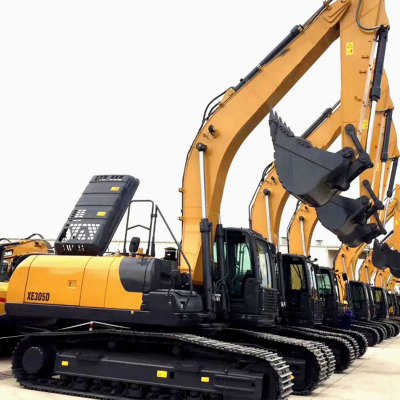
The plant operates a team of highly qualified and experienced engineers who continuously introduce technological innovations and improve products. Currently, the company has a number of independent intellectual property rights and patented technologies. The manufactured construction equipment includes a wide range of equipment such as excavators, loaders, taps, bulldozers and other machines. Products are highly productivity, reliability, energy efficiency and environmental friendliness, as well as the ability to adapt to difficult operating conditions in various climatic and working media around the world.

Awards and fightsFixation

frequently asked questions
1. In which countries are we exporting?
Asia: Vietnam, India, Indonesia, Pakistan, Kazakhstan, Uzbekistan, etc.
Europe: Russia, Belarus, Ukraine, Lithuania, Saudi Arabia, etc.
South America: Brazil, Chile, Paraguay, Argentina, etc.
Africa: South Africa, Ethiopia, Libya, etc.
2. What kind of payment conditions can we accept?
Usually we can work on T/T, 30% TT before production and 70% TT before shipping
3. What ways can we work for delivery?
1) for most countries in Europe, South America and Africa, etc. We can go along the container or Roro through the ocean freight.
2) for neighboring countries of China, such as Russia, Vietnam, Kazakhstan, Uzbekistan, etc. We can deliver by road or railway.
3) for light spare parts in the urgent requirement, we can send it using the international courier service, such as DHL, TNT, EMS or other air transportation.
4. How can you guarantee that you delivered goods to customers?
A: We will provide you with complete information about delivery for you.
5. What are our advantages compared to other manufacturers/factories?
1) Reliable quality: we carefully choose permanent manufacturers to support spare parts, such as engines, bridges, transmission, and many parts developed and produced by us always adapting the best materials.
2) a competitive price: the concentration of mechanized production in large quantities reduces production costs to ensure a competitive price.
3) The service team: firstly, our sales managers work 24 hours a day, are ready to answer your questions at any time. Secondly, a professional training team with senior equipment, ready to provide support services to users and dealers. Most problems can be solved within 24 hours.
4) Fast delivery: As a rule, we can deliver within 10 working days at the plant after receiving prepayment from customers.
6. How can you provide customers after sales service?
A: We will answer you at first and help you solve problems within 24 hours. If we really need your local, we
We will send your professional person to your settlement to help you solve problems without any fluctuations, supply you with comprehensive